Basic Textkernel Connector Setup🔗
Important
The Salesforce user configuring these settings in the Salesforce org must be a System Administrator (or similar profile) to have the appropriate access rights to the settings.
Core Package Installation🔗
-
Install Textkernel Connector package (see links in Package Descriptions or from Salesforce AppExchange). Typically the Textkernel Connector App should be visible to Admins (to use Textkernel, Recruiters only need to access a Tab included inside the package, and not the App itself), and the Unlocked Components package should be visible to all users.
-
This package manages access on a per-user basis, so you need to assign licenses to your admin user as well as your recruiter end users. If users don’t have a license assigned to them, the components will be invisible and/or unusable.
-
Go to SFDC Setup → Installed Packages
-
Click on the Manage Licenses link to the left of the Textkernel Connector package. On the next screens you can assign and remove licenses to your users. If you do not have enough licenses available please contact your Textkernel account manager.
-
-
The package includes 3 permission sets which should be assigned to users within the Org:
- Textkernel - Admin Access: This permission set contains maximum access level for all Textkernel objects and tabs and it's intended for the administrative user who sets up and maintains the integration.
- Textkernel - Manager Access: This permission set allows managers to view reports on Textkernel search usage. It should be used in combination with “Textkernel - Recruiter”.
-
Textkernel - Recruiter Access: This permission set contains access level for all Textkernel objects and tabs that are needed for regular user. It's intended for the recruiters who will use Textkernel use cases inside Salesforce.
-
Go to SFDC Setup → Permission sets
- Select one of textkernel permission sets
- Press Manage Assignments button
- Click Add Assignments button
- Select users via Checkbox
- Click Assign button
Configure Textkernel Portal🔗
Note: you can skip this section if you are only using the Recruiter CV Parsing workflow. Textkernel Portal is needed for Search and Match workflows, external Candidate sourcing, Candidate Engagement automtion, and Market IQ workflows (except the Market IQ Account import widget).
When using Textkernel Portal, you can configure industry-standard single-sign-on, and quickly provide access to Textkernel’s fully-features user interfaces without needing to build custom code.
Setup Identity Provider🔗
This procedure discusses how to configure Salesforce as your SAML 2.0 Identity Provider, so that Salesforce users will have single-sign on with Textkernel Portal. The configuration process would be different if you are using a different identity provider.
-
Enable Identity Provider
SFDC Setup → Identity Provider → Enable Identity Provider
-
Setup certificate
Depending on your identify architecture, either create a Self-Signed Certificate or upload your own certificate.
In order to upload a certificate, go to SFDC Setup → Certificate and Key Management → Press Import From Keystore → Click Choose file button → Upload certificate → Enter password → Press Save button
-
Configure Textkernel “Portal” Connected app
SFDC Setup → App manager → “Portal” app dropdown menu → Manage app:
-
Share your metadata with Textkernel support team: press “Download Metadata” button in SAML Login Information section.
-
When you receive the confirmation from the Textkernel support team that your metadata has been setup, fill in SAML Service Provider settings. Press Edit policies and configure these fields.
Important
Your environment values will be different, these values are provided only as examples. Please contact your assigned Technical Consultant to receive the correct settings.
- Entity Id:
https://sso-staging.textkernel.nl/shibboleth - ACS URL:
https://sso-staging.textkernel.nl/Shibboleth.sso/SAML2/POST - Issuer:
https://demo.my.salesforce.com - IdP Certificate: Select your preferred certificate from step 2
- Run As: Select a user that will be used to run the SSO protocol. The "Run As" user should be a standard Salesforce User. The user can be a dedicated integration user or you can re-use another user. The user requires:
- Access to the "Portal" Connected App (see the next step in the configuration procedure for configuring that access)
- Textkernel - Admin Access permission set assigned from the Textkernel managed package
- A license to access Textkernel’s managed package
Important
Please make sure that the "Run As" user has read access to the SF User object. This is required for SSO to pass releavant user information to our Textkernel backend and without this your users will not be able to access the portal.
- Entity Id:
-
Setup Trusted URL🔗
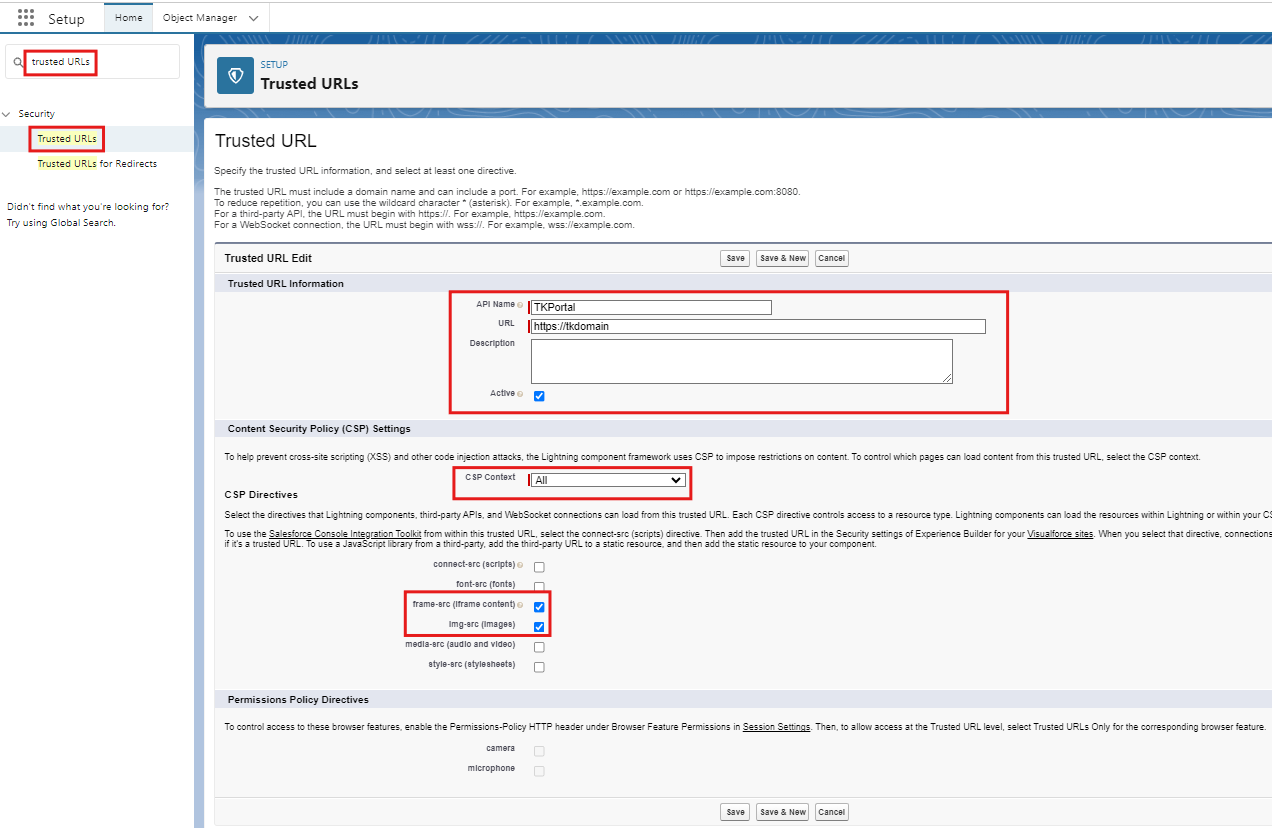
With Summer '24 Release, Salesforce updated the delivered CSP directives for Lightning pages which can prevent externally hosted fonts, images and external websites from loading within an iframe on your Lightning pages (check release notes). Because of this change, all orgs need to have the Trusted URLs list in Salesforce. Follow below steps to configure it:
-
Add Trusted URL SFDC Setup → Trusted URLs → New Trusted URL
-
Once in the Trusted URL Edit view
a. Add the “TK_Portal” in the field “API Name”.
b. Add the “URL” for TK domain URL (should have been provided to you by Textkernel).
c. Make sure the Active checkbox is checked.
d. Make sure CSP Context is selected as “All”.
e. Enable CSP Directives - frame-src (iframe content) and img-src (images).
f. Click “Save”.
Saleforce Cookie Policy🔗
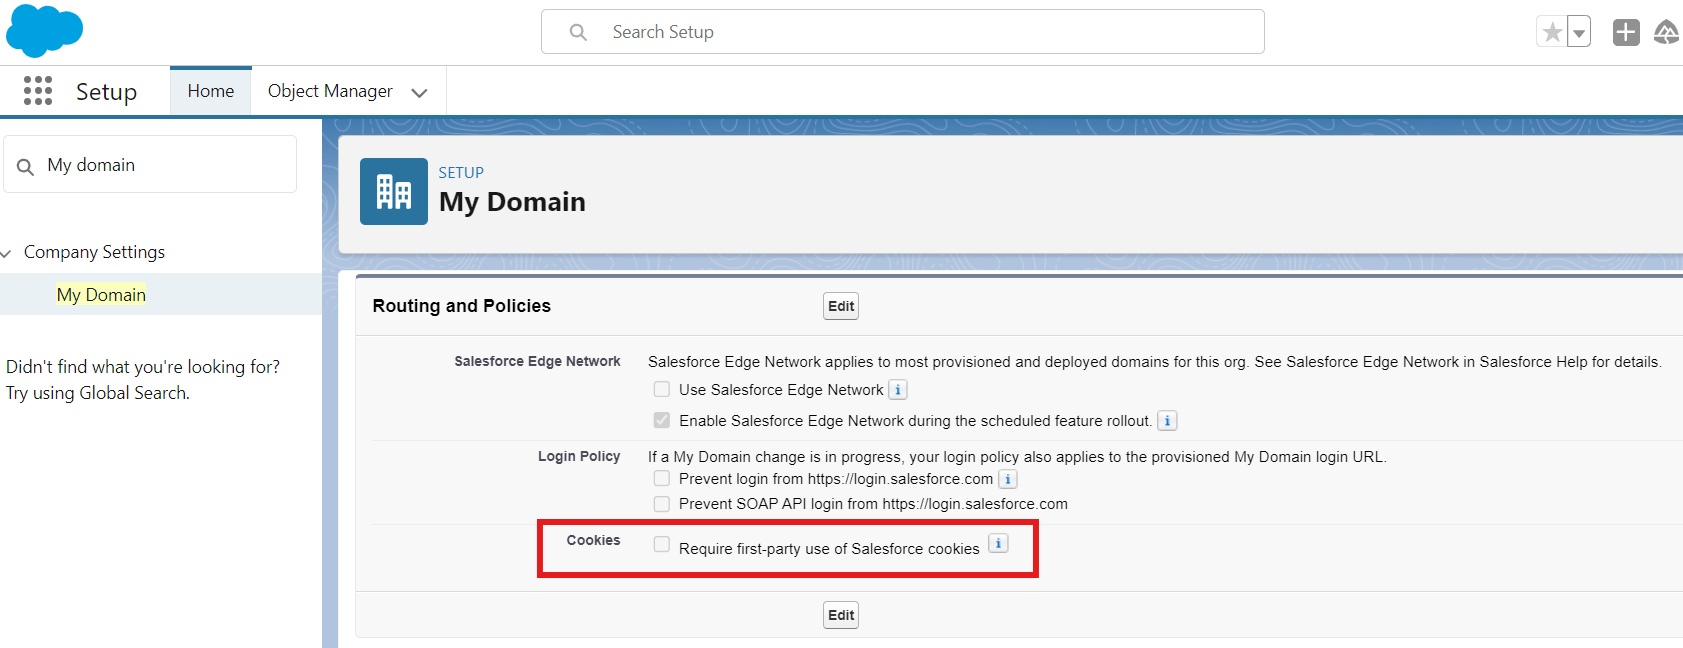
To test custom functionality and code that uses a Salesforce session cookie before browsers fully block third-party cookies, Salesforce enabled a setting in Winter '25 Release, which impacts loading of iFrame component (check release notes). This change blocks TK Portal (iFrame component) on Google Chrome and Microsoft Edge browsers (It works on Safari, Firefox and even Chrome Incognito Mode). To ensure that you have the correct settings:
-
Go to SFDC Setup → My Domain
-
Scroll down to Routing and Policies section, make sure the Cookies checkbox is unchecked.
Assign access to the “Portal” Connected App for whichever users need access.🔗
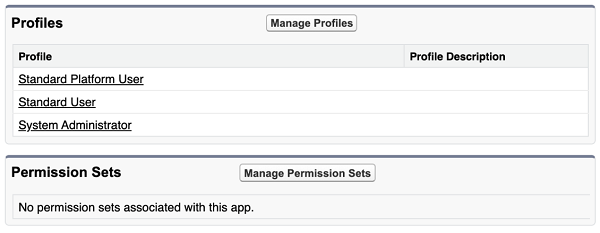
Any user (e.g. recruiters or administrators) who will use the Textkernel UI inside the TK Portal iframe needs this access. You can provide access either using Salesforce Profiles or Salesforce Permission Sets within your Org. Use either the Manage Profiles button or the Manage Permission Sets button to assign access as appropriate. If a Salesforce User attempts to access the Textkernel Portal Tab without the access permission, they see a standard Salesforce error message saying “Insufficient Privileges”.
Configure Textkernel Portal settings🔗
The Textkernel App is included in the managed package, and is where an Administrator user configures the integration. Within the app, the Textkernel Portal page is where you configure your settings if you are using the Textkernel Portal tab in your integration.
Note
Even if you don't plan for your recruiters to use Textkernel Portal UI, it is often useful as a tool to see what data is visible in the Textkernel search index. So, we recommend that this always be setup and available to the administrative users.
- Go to Textkernel App → Search and Match Setup → Textkernel portal settings tab
-
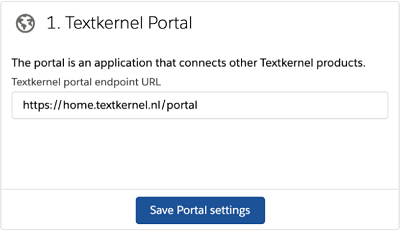
Enter the Textkernel portal endpoint (you will receive this information from Textkernel customer support)
-
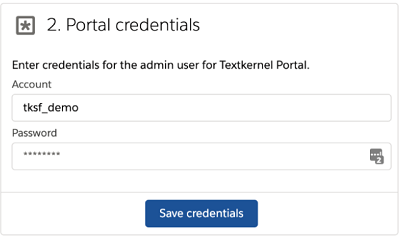
Specify Portal account credentials (you will receive this information from Textkernel customer support)
-
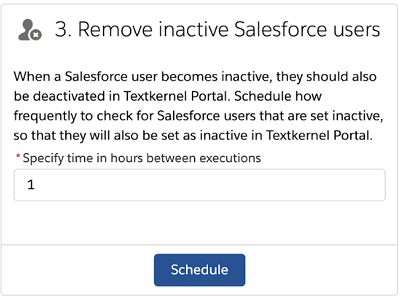
Specify when to Remove inactive Salesforce users.
This is a scheduled background job that runs periodically to check to see if Salesforce users have become inactive. If there are inactive Salesforce users, then the job makes sure they are deactivated in Textkernel Portal, too, so that user access is kept synchronized between Salesforce and Textkernel Portal.